Wednesday, August 10, 2011

'Baked vada' curry

Vada curry combined with idli or dosa makes many of us drool.  It is generally prepared by crumbling deep fried 'vada's into the spicy curry. But feeling very lazy to deep fry those vadas and then making the curry I thought of a shortcut, can also be called 'the fat cut'. I decided to try baking the vadas so I can save time and reduce the addition of fat in the form of oil. The baked vada curry is no different from the original version in taste and texture. If you have an oven you can make this baked vada curry in no time.

Things you'll need:
channa dal - 1/2 cup
onion - 1 1/2, finely chopped
tomato - 1, finely chopped
green chillies - 2 medium sized, finely chopped
curry leaves - 5
coriander leaves - to garnish
salt - to taste
ginger garlic paste - 2 tsp
chilli powder - 1 tsp
oil or cooking spray - as needed
fennel seeds - 1 tsp

Yield - serves 2 or 3 persons

Method :
Step 1:
Soak the channa dal for atleast 5 hours. Grind the dal coarsely with 1/2 onion, green chillies, curry leaves, salt. Preheat the oven to 350 degrees. Shape the vadas and place them in a baking tray greased with oil or cooking spray. Bake the vadas till browned on both sides (you have to flip the vadas in between)


Step 2:
Mean time, heat oil in a pan, add the fennel seeds. When the seeds splutter add remaining onions and fry them until translucent. Add ginger garlic paste, tomato, curry leaves, chilli powder and salt. Add little water and close the lid and allow it to cook in slow flame.

Step 3:
When the vadas are done, crumble them (of course, you have to wait until it's slightly cooled or else you will end up eating idly and vada curry with a spoon) and add into the curry. This will thicken the curry, so add some more water till it is not too thick.

Step4:
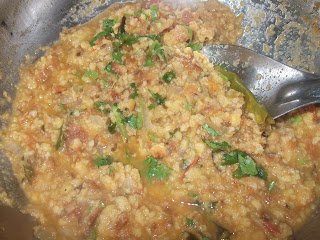
Allow it to cook for a few minutes, switch off the stove and garnish with coriander leaves. Serve with hot idlis or dosas.

tip: If you are not going to have it immediately. Its better to add the vadas minutes before you serve, because if kept for sometime the dal absorbs the water and leaves the curry dry.

note: I haven't tried this in microwave oven. I'll be happy to hear if somebody had tried it.


Sending it out to Vardhini's  Dish it out event
 

Wednesday, July 13, 2011

Beetroot Halwa

We all have heard about carrot halwa or gajjar ka halwa. Ever heard about beetroot halwa? never heard of it until my mom made it when I was in college. I never worried about how she got the recipe or its origin..It tasted good, tats all I wanted. After marriage, once when we had some guests I tried beetroot halwa for dessert. It came out so well (there's nothing to go wrong in a dessert until it's sweet to eat..my husband's theory), and the guests were all praising about it "wow! never heard of beetroot halwa", "It's so delicious".  Nowadays I am not worried about beetroot getting wilted in the refrigerator..there's always a recipe in which no one would hate having beetroot.

Things you'll need:
Beetroot - 2 (medium sized)
condensed milk - 1/2 cup
sugar - 1 cup (can be increased or decreased according to preference)
ghee - 3 tbsp
cashews - 2 tbsp chopped

yield - 4 servings

Step 1:
Peel the beetroots, wash them and grate them to fine pieces. You can alternatively chop them and coarsely grind them in a food processor.

Step 2:
Heat 1 tbsp of ghee in a non-stick pan and fry the beetroot for about five mins until the beetroot starts to soften.

Step 3:
Add the condensed milk and let it cook until all the milk is absorbed. Now add the sugar. This will leave the halwa watery. But it will thicken once the sugar is absorbed into the halwa.

Step 4:
When the halwa thickens and leaves the sides of the pan, add the remaining ghee and stir for a couple of mins.

Step 5:
Switch off the stove, garnish it with cashews and allow it to cool.


Serve it warm with a scoop of vanilla ice cream (Yummo!!) or just as it is..Its delicious either way..

Wednesday, June 8, 2011

Raw banana cutlet

This is a recipe I tried from the website spiceindiaonline.com. I got bored of the usual raw banana fry and podimas. So I wanted to try a different recipe. The raw banana cutlet was very simple and tempting. At the very first time it came flawless and appreciated by my husband.
The ingredients are simple and takes less time to prepare

Things you'll need :
Raw banana - 1
Onion - 1 finely chopped
Ginger - 1 " piece minced
garlic - 1 or 2 pods minced
curry leaves - 3 or 4
coriander leaves - 2 sprigs
spinach leaves - handful
green chillis - 2 finely chopped
salt - to taste
turmeric powder - 1 tsp
chilli powder - 1 tsp (optional)
Oil - for deep frying or shallow frying

Yield - 15 cutlets


Method:
Step 1 :
Peel and chop the raw banana and cook them in little water with turmeric powder and little salt. Let it cool and mash it without lumps.

Step 2 :
Add the rest of the ingredients with the mashed banana and mix well. Check for salt.

Step 3 :
Shape them into cutlets  and either shallow or deep fry the cutlets according to preference.

Serve them with ketchup or chutney of your choice. 


Monday, May 16, 2011

Mixed vegetable stew

This is a very tasty dish which would be best when paired with aappam or idiyappam. I think this dish is of kerala origin, but not sure though. This would give a twist to the traditional aapam-coconut milk combination. Easy to prepare (except for the trouble of cutting all the vegetables!!) and simply delicious.

Things you'll need:

Mixed vegetables (carrot, beans, cauliflower and potato) - 2 cups
Whole garam masala (cinnamon, cloves and cardamom) - as required
Green chillies - 3
Curry leaves - a handful
Coriander leaves - 2 sprigs
Thick coconut milk - 1 cup
Thin coconut milk - 1 1/2 cup
salt - as required

 Serves 2-3 persons


Method:

Step 1:
Pressure cook the vegetables with very little water and salt.

Step 2:
Pour a little oil (preferably coconut oil) in a pan, add the whole garam masala and when they start to crackle, add the green chillies and curry leaves. Then add the thin coconut milk and let it boil.

Step 3:
Add the vegetables and adjust the salt, and add the thick coconut milk and cook for a couple of minutes. Switch off the stove and garnish the stew with coriander leaves.


Serve with steaming aapams or idiyappams.

Andhra style chilli chicken

This is a very popular dish in Andhra. My husband had it in an andhra speciality restaurant while he was in Bangalore. When we hear chilli chicken most of us picture the Chinese version of chilli chicken, so did I when my husband told about this dish. But this is supposed to be a very spicy dish with the flavors of lots of green chillies. I usually have the feeling of sweating at the back of my head when I eat spicy food, but I had that feeling when I opened the lid after cooking the dish, Its that spicy!!!
So If you want to give a kick start to your sore taste buds with some spice here you go...

Things you'll need:
Chicken - 1lb
Onion - 11/2 chopped
Green chillies - 7 or 8
curry leaves - handful
ginger garlic paste - 1 tbsp
lemon juice - from half lemon
ginger - 1 inch piece minced
pepper powder - 1 tsp
turmeric powder - 1tsp
salt - as required

To grind:
cinnamon stick - 1 inch piece
cloves - 1tsp
cumin seeds - 1tsp
fenugreek seeds - 1/2 tsp
fennel seeds - 1 tsp
cardamom - 1
kasoori methi - 1/2 tsp (optional)


Serves 2-3 persons

Method:

Step 1:
Clean and cut the chicken. Pressure cook with a little water, turmeric powder, pepper powder, salt, ginger pieces and a 1/2 onion (chopped).

Step 2:
In a pan pour some oil and splutter some cumin seeds, fry the onions, green chillies and curry leaves. When the onions turn translucent, add the ginger garlic paste and fry till the raw smell leaves. Then add the ground masala and salt (balancing the salt added to chicken). Add the broth from the cooked chicken and cook the mixture to a thick gravy.

Step 3:
Add the chicken, cover and cook the gravy for a couple of minutes. It should not take more time since the chicken is already cooked. Switch of the stove once the gravy is slightly dry. Squeeze the lemon juice on the gravy and mix well.


Now your spicy Andhra style chilli chicken is ready to be served with plain rice or roti.

Note: Lemon juice is optional, just to reduce the heat of the chillies.


Friday, April 15, 2011

Chilli kothu parotta

I could only hear the sound of 'dosa karandi' (steel dosa spatula) dashing on the dosa tava when i think of kothu parotta. It sounds like a sweet music when you really have a craving for the dish. I have heard about it but never have tasted this dish until I finished college. My sister only introduced me to this yummy dish (she goes to restaurants with her friends sometimes unlike me who only knows the path from home to college and vice versa..its ok if you don't believe this...).
I have added egg in this dish which makes it extra rich. But you can avoid adding egg and just make it as a eggless spicy kothu parotta.
Considering one of my friend's idea I have uploaded pictures of the cooking steps also. But I am not sure I can do this for all the recipes. I'll try to post pics of all the steps for most of them.

Things you'll need:
Frozen parottas - 6
Onion - 1 minced
Tomato - minced
green chillies - 3 minced
Ginger garlic paste - 1 tsp
chilli powder - 1 tsp
turmeric powder - a pinch
Eggs - 2 (I used egg whites. can use 1/2 or 3/4 cup of it)
salt - according to taste
Oil - 3 tbsp
curry leaves - 5 or 6 chopped
coriander leaves - to garnish

Serves 2-3 persons


Method:
Step 1:
Thaw the parottas to room temperature before starting the cooking process.

Step2:
Pour oil in a pan, temper a tsp of cumin seeds, and saute the onions along with green chillies and curry leaves until the onions turn translucent. Saute the ginger garlic paste until the raw smell is gone, and add the tomatoes.

Step3:
Once the tomatoes turn soft, add the chilli powder, turmeric powder and salt and cook them in slow flame with lid closed, until the masala is cooked well. Meanwhile shred the parottas in a mixer grinder or food processor. The parottas should be shredded enough with three or four pulse operations.


Step4:
Add the eggs or egg whites to the masala and stir continuously scrambling the egg while stirring. when the eggs are almost dried, add the parottas and stir until the parottas are coated with the masala and eggs. Switch off the stove and garnish with the coriander leaves.

Saturday, April 9, 2011

Soya burger

After discovering and succeeding with the soya kheema gravy, I cant think about different recipes using the soya chunks (I can't do just the kheema gravy with a whole pack of soya!!)..soya kurma, soya manchurian,soya nuggets..but these all sounded very common. why not burger?? I cudnt wait to try it once the idea stepped into my mind. But I doubted whether my husband would like the idea, because he is not a very huge fan of soya chunks. So when my husband went out of station, I couldn't wait to try it out. There were actually a couple of recipes for soya burger, so I am not the first one to try..but this one's my own version of the burger

Things you'll need:
soya chunks - 10-12
onion- 1 (medium size)
chilli powder - 1 tsp
green chillies - 2 no. or according to taste
garam masala - 1/2 tsp
salt - to taste
coriander leaves - 5 or 6 stalks finely chopped
black pepper powder - 1 tsp
turmeric powder - 1 pinch
bread crumbs - 1/2 cup
Hamburger buns - 2

Yield - 2 burgers

Method:
Step1:
Boil 4 cups of water, add the soya chunks and leave them in the boiling water for few minutes. Drain the chunks and rinse them several times squeezing the water each time, until the raw smell form the chunks are gone.

Step2:
Coarsely grind the chunks with the chilli powder, garam masala, turmeric powder, salt and black pepper powder. Mix the onions, green chillies, coriander leaves and bread crumbs with the ground mixture.

Step3:
Divide the mixture into two parts and shape each part  into a burger. Drizzle little oil in a pan and shallow fry the burgers until they are evenly browned on both sides.

Step4:
Place them between the burger buns, spread some mayonnaise or your favorite sauce, top it with some tomatio slices and lettuce. Take a bite!!

Note: The bread crumbs can be added or reduced according to the texture of the burgers. It should not be too dry or too sticky.