Friday, May 11, 2012

Eggplant tomato chutney (Kathirikkai thakkali thokku)

I am one of those people who love all the vegetables but give the cold shoulder for eggplant/brinjal. I can only tolerate it in 'puli kuzhambu' or 'ennai kathirikkai' both giving a tangy and spicy taste to the eggplant. If it is in sambar or stir fried, I would rather stay hungry (not quite true!!). After marriage I didn't have much choice to avoid eggplant since my husband was not in my 'eggplant haters' club. So I ended up doing 'ennai kathirikai' each time he gets the grocery. I couldn't imagine any other dish with eggplant until my mother-in-law made this eggplant tomato chutney. It is really delicious, simple, easy, and you really don't feel like eating the eggplant bcoz they are cut into bite size pieces and are almost mashed when the chutney is ready. Now I have one more dish to do with eggplant (my husband would be more than happy that there's an alternative to ennai kathirikai so he doesn't have to eat it every other week)..OK, without further boredom, here comes the recipe for the chutney.

Things you'll need:

Eggplant/Brinjal - 2, medium, sized, cut into bite-sized cubes
Onion - 1, small, chopped
Tomato - 1, medium, chopped
Chilli powder - 2 tsp
Turmeric powder - 1/4 tsp
Salt - as required
Peanuts and sesame seeds - 1tbsp each, roasted and coarsely ground
Curry leaves - 2 or 3, coarsely chopped
Mustard seeds - 1 tsp
Oil - for tempering

Yield - Serves 2-3 persons

Method:

Step 1:
Heat oil in a pan and add mustard seeds. When the mustard seeds splutter, add chopped onions and curry leaves. Saute until the onions turn translucent.

Step 2:
Add the tomatoes and saute until the tomatoes turn soft. Mash them gently. Add the eggplant cubes (The eggplant should either be chopped before adding to the pan or chopped beforehand and soaked in water to avoid discoloration). Saute for a couple of minutes and add turmeric and chilli powders and salt. Add small amount of water just to avoid the vegetables sticking to the bottom of the pan, mix well. Reduce the heat, cover and cook until the eggplants are cooked well and oil separates at the top.


Step 3:
Add the peanut-sesame seed powder, stir well and switch off the stove. Serve it with dosas, idlis or even your favorite parathas.


Sending this recipe to Vardhini's Dish it out event hosted by Pavani's Cook's hideout

Thursday, May 10, 2012

A new addiction...Crochet

Knitting and sewing was in my hobby list from ever since I could remember. But for some reason I didn't pursue it very seriously. Only recently I battled all my blocks and finally got into it. But before trying knitting I wanted to practice crochet (I believed crochet was much easier than knitting). I found my motivation through a friend who was into knitting for a very long time and has decorated her home with her beautiful creations. I came to know knitting is not only for baby sweaters and hats, but has lots of uses once your imagination is untied. I searched for basic crochet patterns in the net and learned crochet through lots of YouTube videos and couldn't stop myself from crocheting from then. I'll make sure to add all the links when I find time.

I first started with a hat for my daughter. I was a bit overconfident and did a slight mistake. I thought that the hat wouldn't fit my toddler's head and did an extra step which resulted in a large hat. It fit my toddler's head but it was not a perfect fit I should say. It was a bit loose for her. So I decided to keep that for myself. I was feeling guilty and tried to make it up for her by crocheting another hat. I followed the exact gauge and stitches. But this time the hat looked smaller. It might be because of the yarn or the needle. I promised to myself that next time I am going to follow the rules very strictly.

My next project was once again a hat for my little one. By this time the weather was getting better, so I decided to make a fancy summer hat. With a YouTube video to help I finished the hat and it perfectly fit my little one's head. Phew!! what a relief.

This time I wanted to make a small purse with a long string to take my phone and house keys while I went to the park with my daughter. I wanted a very simple and easy pattern, but the handbag patterns I saw were very complicated and seems like it would take a long time to complete. So I crocheted the bag with my own ideas. I also made a button with the leftover yarn, viewing a YouTube video. My daughter loved it and wanted to take her water bottle in the bag, to the park...Hmm Mothers are made to sacrifice..'No problem I can make a handbag for myself sometime later' I told myself.


My husband was very cross with me ..("You are making hats and bags for you and your daughter, what about me?"). OK. Here you go Darling Hubby...A smart crew cap for you. I found this pattern in a YouTube video. It didn't come as exactly as shown but it is still good and he wore it very proudly on our wedding anniversary.

link for the pattern: http://www.youtube.com/watch?v=gEffgaeEbus


There's some leftover yarn after the bag. I searched for a pattern to finish off the yarn. A shrug pattern got my eye at lionbrand.com. They have a huge collection of crochet and knitting patterns. And they also have an option to buy the necessary yarn and other accessories from their online store.
This sequoia shrug (I'm not sure if I spelled it right..) took quite a long time for me to finish plus I had to buy extra yarn. But it's worth the effort. I was very pleased by the result.

Link for the pattern: http://www.youtube.com/watch?v=2nB94a0bAZg


These are the small bow clips I made for my daughter
http://www.youtube.com/watch?v=Hcxz3r9VZoQ

My next project is a baby blanket and sweater for my friend's newborn girl. I hope I finish it before the baby starts walking..lol will upload the photos once I finished this projects..

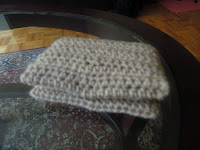
PS: In the middle of the blanket I finished a wallet (cant wait until I finish the blanket and sweater..). This wallet is an improvisation of a basic credit card purse pattern by bobwilson which I saw in You Tube. I have added an additional card space so that you have three spaces for keeping your money , card and even your phone.
The basic pattern can be viewed at http://www.youtube.com/watch?v=YFbqXRp84NI

Sunday, May 6, 2012

Methi Paratha

Methi paratha is a very common tiffin variety in North India, prepared either as stuffed paratha or by mixing methi with the chappati flour. However I've been preparing methi dishes only for the past couple of years, but have only had ready made Methi parathas from the Indian grocery store. I liked the way they were prepared by mixing methi and flour together unlike the stuffed paratha. So I tried this recipe once and found it to be a very simple and easy process. Surprisingly my kiddo didn't differentiate it from the regular chappati and she also liked the taste. That's one big success for me...Check out this easy and healthy recipe that can be substituted for your regular chappati or paratha.

Things you'll need:
Fresh or dried fenugreek (methi) leaves - 2 cups
Chappati flour - 3 cups
Garlic - 2 gloves, finely minced
Cumin seeds - 1 tsp
Chilli powder - 1 tsp
Cumin powder - 1 tsp
Salt - as required
Oil - 2 tsp
Water - for kneading the dough

Yield - 6 parathas

Method:

Step1:
Wash the methi leaves and soak them in lightly salted water with a pinch of turmeric for few minutes. This is to remove all the bitterness in the methi leaves. Squeeze the leaves and chop them.

Step2:
Heat 2 tsp oil in a pan, add the cumin seeds. When the cumin seeds crackle add the minced garlic and the methi leaves. Saute them for couple of minutes, add the chilli powder cumin powder and little salt. Saute until the methi leaves are cooked. Switch off the stove and let it cool.

Step3:
Mix the chappati flour with 1 tsp of salt in a bowl, add the methi leaves and knead it to a soft dough adding water little by little. Keep it aside for half an hour. (Leaving them for some time makes the parathas even softer)

Step4:
Divide them into 6 equally sized balls. Roll them one by one and cook them in medium heat. Spread butter on both sides.


Serve them hot with your choice of side.

Saturday, May 5, 2012

Cheesy mac and broc!! (Spicy macaroni and cheese with Broccoli)

Nowadays I have got into the practice of innovating lunch box ideas just to make something convincing for my preschool so that she would eat her lunch at school. My little one is not a great fan of mac and cheese and would back off even if I say the name. I tried the mac and cheese recipe with white cheddar cheese instead of the orange cheese (which I have already posted in this blog) and named it as white pasta (Yeah!! I have to invent new names too). She liked it and ate it only the first day and it came back untouched for the next couple of times.. So I made a spicy version of the mac and cheese with broccoli (That's one of the few vegetables she likes) and packed it with a garlic bread and prayed that she should like it. With all that hype...Here's the recipe for the spicy mac and cheese..

Things you'll need:
Macaroni - 1/2 cup
Onion - 1 small, chopped
Garlic - 2 gloves, minced
Italian seasoning - 1 tsp (optional)
Chilli powder - 1 tsp
Salt - as required
Ground black pepper - 1/4 tsp
Fresh or frozen broccoli florets - 1/2 cup
Evaporated milk - 1/2 cup
All purpose flour - 1 tbsp
Shredded cheddar cheese - 1/4 cup
Butter - 2 tbsp

Yield - 2 Servings

Method :

Step1:
Bring 3 cups of water in a pan and bring it to a boil. Add 1/2 tsp of salt and the macaroni, and let it cook for 10 mins until the pasta is cooked (should be firm and not too soft). Drain and keep aside. Cook the broccoli with some salt and pepper (I cooked it well enough to mash it. You could just blanch the florets and add them to the pasta)

Step2:
Heat the butter in a pan and saute the onion and garlic for couple of minutes. Add the Italian seasoning, chilli powder, salt and pepper and saute them for a while. Add the flour and stir until the flour is incorporated into the mixture. Its ok if the mixture turns dry after adding the flour.

Step3:
Add the evaporated milk slowly and mix well so that the flour mixture is mixed well with the milk and no lumps are formed. Once the mixture thickens and becomes creamy, switch off the stove and add the cheddar cheese. Stir until the cheese melts.

Step4:
Add the pasta and the broccoli. Mix them all and serve with a toasted garlic bread. If you are packing it for lunch, warm 2 tbsp of milk and pour it over the pasta before closing the lunch box so that the pasta stays wet and creamy.


PS: My kiddo ate the garlic bread and had only a couple of bites of the mac and cheese. I would give it one more try before going for the next experiment.. I liked it with some nachos though.. :)

Wednesday, May 2, 2012

Vegetable manchurian

My friend would be very happy to see this recipe posted. She was asking to post this recipe ever since I made this for our Chinese themed potluck. I tried this recipe for the first time and luckily it came so well and liked by all my friends. This recipe takes quite a bit of time for the prep work. With a little patience and care this recipe would turn perfect.

Things you'll need:

For the vegetable balls:
Mixed vegetables (I used carrot, cabbage, beans and cauliflower) - 2 cups, grated
Salt - as required
Soy sauce - 1 tsp
Corn flour - 1/2  cup
Chilli sauce - 2 tsp
Boiled rice - 1/4 cup (optional, to reduce stickiness of the vegetable mixture and easily hold them)
Spring onions (white and green parts) - 2, finely chopped
Oil - for deep frying the balls

For the gravy:
Onion - 1, finely chopped
Garlic - 2 cloves, minced
Ginger - 1" piece, minced
Soy sauce - 2 tbsp
Chilli sauce - 1 tbsp
Sugar - 2 tsp
Sweet and sour sauce (optional) - 1 tbsp
Corn flour - 1 tbsp
Vinegar - 1tbsp
Vegetable stock (reserved after boiling the vegetables) or water - 1/2 cup
Salt - as required
Spring onions (green part) - 2

NOTE: Take care when adding the salt as soy sauce contains salt.

Yield - Serves 5-6 persons

Method:

Step1:

Blanch the vegetables with little salt in 1/2 cup water for couple of minutes. Squeeze out the water and reserve it for the gravy. Add the soy sauce, chilli sauce, green onions, corn flour and boiled rice (optional), to the vegetables and shape them into balls. Deep fry the balls and keep aside.


Note: Always try frying one ball first, and if comes together fry the other balls.

Step2:

Heat a little oil in a pan, saute the onions, garlic and  ginger. Add the sauces, vinegar, salt and sugar, and the stock. Bring it to a boil. Reduce the heat and simmer for couple of minutes. Mix the corn flour in 1/4 cup of water and add it to the gravy. Stir until the gravy thickens. Switch off the stove and garnish with spring onions.


Step3:

Add the fried balls just before serving. Serve with fried rice or noodles.

TIP: If you want it dry, skip the stock. Rest all the steps are same.