Monday, December 10, 2012

Boondi laddu

This needs no introduction. People who are addicted to sweets just like me would definitely be in love with laddus be it boondi laddu, mothi laddu, rava laddu etc., The very thought of laddu makes my mouth water. From our childhood we couldn't even remember how many times have we tasted this sweet, one at a time or even more. But we never got bored of laddu or probably never will. Since this sounded a very tricky thing to make at home, I've always bought it rather than making it at home. I attempted once some time after my wedding, but all I got was only boondi and not laddu. After couple of years, one of my friends shared home made boondi laddu for their wedding day (or birthday?) and I was so impressed by the texture and taste of it and it was no different from the laddu we get in stores. I was also surprised when she told me it doesn't take much time and it's not very tricky to make it at all. She gave me some cheat codes on how to make perfect laddu without failure.
But I didn't get it perfect for the first time, but I got confident that I could make it at home and now if my husband asks me whether we could make laddus for an occasion I would never give a second thought.

Things You'll need:
Besan (chickpea flour) - 1 cup
Sugar - 1 cup
Water - 1/2 cup
Oil - for deep frying
Cashew nuts - 2 tbsp, chopped
Raisins - 1 tbsp
Cardamom powder or Rose essence - 1 tsp
Ghee - 2 tsp

Yield - 20-25 pieces

Method:

Step1:
Mix water to the besan little by little and make a batter of pouring consistency (it should not be very thin or watery). In a heavy bottomed vessel add sugar and water, stir until sugar is melted and bring it to a boil. Let it boil in a medium flame until one thread consistency is reached. (This should take five or six minutes after the syrup comes to a boil. Check by taking little syrup in a spoon and touching the syrup with your index finger and thumb. The syrup should for a single thread when the index finger  and thumb are stuck together and released.). Add the cardamom powder or rose essence to the syrup and switch off the stove.

Step2:
Using a ladle with holes ("jalli karandi")  pour the besan into medium hot oil, so that the besan forms into small balls (boondi) in the oil. Once the balls are fried and float above, pick them up, shake the excess oil and place the boondis in the hot syrup.

Step3:
Repeat with remaining batter. Before adding the last batch of boondis (or even couple of batches before the last) coarsely grind the boondis and add them to the syrup. This will help in binding the boondis together. Mix the boondis well into the syrup.

Step4:
Heat the ghee in a pan and fry the cashews and raisins. Add them to the boondi-syrup mixture. When the syrup is warm enough to handle, scoop a handful of boondi-syrup mixture and press it into a laddu. Repeat with remaining boondi-syrup mixture. Let it cool for sometime until the laddus are bound together and they are all yours.

Baklava!!!

I didn't know that a dessert named baklava existed before my friend brought this for us when we met in the park. She was suddenly caught with desire to cook desserts and lucky for us we got something to snack every other day we meet in the park. This is a greek dessert not very easy to make, but uses very less ingredients tastes yummy. I made this for a get together, for the first time and got a lot of appreciation. There's nothing to go wrong in this and with a little bit of painting experience (I am not kidding when I say this) you could do this very quickly.

Things you'll need:
Filo dough (you could find it the freezer section of your supermarket) - 1 pack (contains about 20 sheets)
Sugar - 1 cup +1tbsp
Water- 1/2 cup
Mixed nuts (almonds, walnuts,pecans) - 2 cups (coarsely ground)
ground cinnamon - 1 teaspoon
Pistachios - a handful, coarsely ground
Butter - melted, as required, for brushing the dough

Yield - 24 pieces
Method:
Step 1:
Preheat the oven to 375 degrees.
Remove the filo dough from the wrap and place it flat on the counter covering with a damp kitchen towel. This prevents the dough from getting dry and breaking. Mix cinnamon and 1 tbsp sugar into the nut mixture.


Step2:
Grease a shallow bake pan, arrange one of the filo sheets and brush it with butter (brush liberally to cover the entire sheet). Repeat with 6 more sheets. Divide the nut mixture into halves. Layer one half on the filo dough layer.


Step3:
Arrange seven filo sheets one by one, brushing each sheet with butter, above the nut layer. Layer the remaining half of the nut mixture on top of the filo layer. Arrange the remaining filo sheets, one by one, brushing each one with butter.


Step4:
Sprinkle the pistachios on top, score the sheets into 24 pieces (you don't have to cut through, just score it gently). Place it in the oven for 30 to 45 minutes.

Step5:
Prepare sugar syrup with 1 cup of sugar and 1/2 cup water. (There is no consistency constraint here..so a not-so thick syrup should do..)

Step6:
When the baklava is ready, Remove it from the oven and pour the sugar syrup evenly over the baklava and allow it to cool.

Wait!  not yet...Chill it in the refrigerator for at least an hour or overnight for best results..and there's nothing stopping you from savoring the delicious baklava..


Pullover newborn sweater

Nowadays crochet craze is eating me up more than I eat my food..So I am ending up putting crochet posts rather than recipes in recent times. But I guess this is going to be my last crochet time for a quite sometime. My husband is also helping me improve my crochet skills by giving me new ideas. One such idea was this newborn sweater for his friend's newborn son. I have crocheted button-on sweaters for couple of friends' newborns, but this time my husband suggested to do a pullover sweater. But I found patterns for jackets or cardigans but couldn't find one-piece pullover sweater pattern. I was a bit lazy to do front, back and sleeves separately and attach them. So I did a mix of the cardigan pattern and my own pattern.  I also did a matching beanie cap.


Pattern for the sweater:
Chain 38.
Row1:
Double crochet in third chain from the hook and all the chains. (36 DC)
Row2:
Chain 3, turn DC in next 5 stitches, (DC,chain 1,DC) in the next stitch.
DC in the next 4 stitches, (DC,chain 1, DC) in the next stitch.
DC in the next 12 stitches, (DC, chain 1,DC) in the next stitch.
DC in next 4 stitches (DC,chain 1,DC) in the next stitch.
DC in the next 6 stitches.
Rows 3-6:
Chain 3 DC in each stitch across, (DC,chain 1,DC) in each chain 1 space.
Row 7 (Forming armholes):
Chain 3 DC in each stitch, when you reach the chain 1 space, fold the piece such that the 1st and 2nd chain 1 spaces are aligned and DC in the chain spaces together.
For reference you can view this video:
http://www.youtube.com/watch?v=4ZQJohHaMF4&list=PL4B355BC209651362&index=10

Repeat the same for the next chain 1 spaces. Continue DC in the rest of the stitches.

After finishing the last DC in the 7th row, slip stitch in 3rd chain of the first DC of the same row.
Rows 8-13:
Chain 3, DC in each stitch across, slip stitch with 3rd chain of beginning chain.
(I used red and yellow alternatively. You can either follow a single color or change colors between rows.)
After slip stitching the last row cut your yarn from about 2 inches of length, pull the loop out and tighten the yarn.

Sleeves:
Join the yarn at the joint of the arm holes and body part, chain 3, DC in each stitch across and slip stitch in the 3rd chain of the beginning chain.
Continue this pattern for as many rows you want.
(Make sure you have equal number of DC in each row, so that the sleeves look even.)

Refer to:
http://www.youtube.com/watch?v=HosVpcU0s7Q&list=PL4B355BC209651362&index=16

Edging: (For the neck, arms,and waist)
Join yarn, chain 1 and single crochet in each stitch across, slip stitch at the beginning chain.


Here's the finished sweater...


I made a matching hat with the sweater which is a regular beanie with ear flaps whose pattern you might find in youtube.


Tuesday, October 23, 2012

Crochet dress

Couldnt wait to post this dress I crocheted for my toddler girl. As soon as I finished crocheting this dress I made her wear this and took a few snaps so that I could post it right away. I will try to post the patterns as soon as possible. The pattern is designed by me. Until you wait for the pattern you could take a look at the dress..


Mushroom Biriyani

For me, cooking vegetarian is very hard. Actually it's not the cooking that is hard but deciding what to cook really is. If we are having some guests at home, I would be very happy if they are non-vegetarians. Because I could get away with one chicken curry or fish curry and rice. If they are vegetarians, I am doomed. I would always like to do something unusual for my guests. So I try to  think away from the usual recipes. One of the lifesavers is mushroom biriyani. It's a very easy, quick and yummy recipe, I love to make so that I could finish it off in minutes and turn my focus to other items like appetizers, desserts etc., I always make my pulao or biriyani rice in my rice cooker, but if you prefer to fry the rice and vegetables separately and then cook it in the rice cooker, its ok to that also. Taste dosen't change.

Things you'll need:
Basmati rice - 2 cups
Onion - 2, cut lengthwise
Tomato - 1, cut lengthwise
Mushrooms - 1 cup, cubed (I used button mushrooms)
Capsicum or bell pepper - 1, cut lengthwise
Ginger garlic paste - 1 tbsp
Green chillies -  3 or 4 according to your spice tolerance
Mint leaves (optional) - a bunch
Coriander leaves - a handful
Lemon - 1/2
Whole garam masala - Cinnamon - 1 inch stick, cloves - 5, Cardamom - 2, Bay leaves - 2
Chilli powder - 1 tsp
Coriander powder - 1 tsp
Turmeric powder - 1/4 tsp
Salt - as needed
Oil -2 tbsp
Water - 4 cups

Yield - Serves 3 to 4 persons

Method:

Step 1:
Soak the rice for 15 mins.

Step 2:
Heat oil in the rice cooker or a pan, add the whole garam masala. When the cloves crackle, add the onions, fry till translucent, add green chillies and ginger garlic paste. Fry till the raw smell of ginger garlic is gone, then add the tomatoes, capsicum and mushroom and mint leaves. Fry until the raw flavor of the vegetables is gone, then add the turmeric, chilli and coriander powders.

Step3:
Add rice and fry until rice is well coated with the mixture. Add water and salt. If frying in a separate pan, transfer the contents to the rice cooker. Squeeze the lemon juice into rice mixture.


Step 4:
When done, garnish with coriander leaves and serve with raita and your favorite curry.

Tip:
You can also cook this in the pressure cooker. Cook in medium heat for two whistles.

Stir-fry Noodles

My daughter is a noodle lover. Although she is a picky eater, we can trust her with noodles every time we go out to eat or having lunch/dinner at a friend's place. From instant noodles to authentic Chinese noodles she likes all kinds of them. If they don't have vegetables..good. If they are spicy..great. If they have chicken...wow!!. But somehow she doesn't appreciate the noodles I make for her at home or for her school lunch. I seriously don't know what's going wrong. I used the same ingredients they mentioned in the chowmein recipes, used thin noodles which she used to like in restaurants, used less vegetables, sometimes none. But she eats only a bit, which I would have forced into her mouth. I am going to still try all noodle recipes I could get and win her appreciation someday. Below is my version of the stir fry noodles recipe. But I would really like to know if someone has a different version of the stir fry noodles to make it taste like those in restaurants. 

Things you'll need:
Chowmein noodles - 1 pack
Carrots - 1/2 cup, diced
Cabbage - 1/2 cup, diced
Capsicum - 1/2, cut lengthwise
Garlic - 5 cloves, minced
Soy sauce - 2 tbsp
Oyster sauce - 1 tbsp
Stir fry sauce - 1 tbsp
Salt - as needed (go easy on the salt since the sauces have salt in them)
Pepper - 1 tsp, crushed or coarsely ground
Oil - 1 tbsp

Yield - Serves 2-3 persons

Method:

Step 1:
Cook the noodles according to package directions. Drain, mix in some oil, and let dry on a plate.
Heat oil in a wok or large pan. Stir fry the vegetables, garlic with salt and pepper, until the vegetables are almost cooked but crunchy.


Step 2:
Add the noodles and stir fry the noodles mixing the vegetables and noodles. Mix the sauces in a bowl by adding little water. Add them to the noodle mixture and stir fry until the noodles are dry and the sauces are well absorbed.

Serve hot with your favorite side.


Tip: Before adding the noodles you could add a scrambled egg to add extra flavor. You could also make it more spicy by adding some chilli sauce.

Friday, September 28, 2012

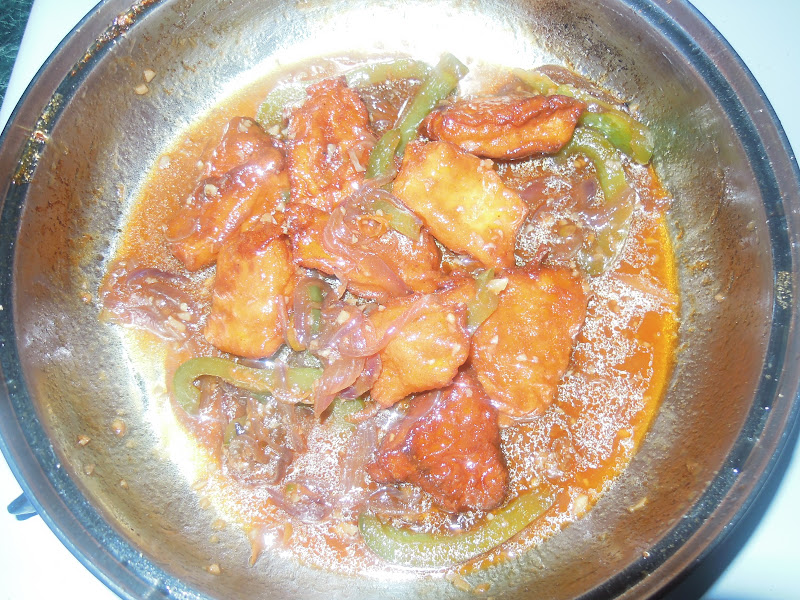
Chilli fish (gravy)

Indo-chinese recipes are my all time favorite. Whenever I want to take time off from my regular dishes and do something special for dinner or lunch I opt for Indo-chinese food without blinking an eye. Usually it will be a Manchurian and fried rice. But this time I wanted to do a seafood special. Chilli fish is the first thing came to my mind. We usually go for chilli fish with fried rice/noodles when we do a take-away. Somehow I thought it takes a lot of time to prepare it and hence never attempted to give it a try. Yes, it took a bit of my time but it wasn't so complicated as I thought. I made it for a Saturday dinner and served with veggie stir fry noodles.

Things you'll need:
Fish fillets - 2 (tilapia or any firm fish)
Soy sauce - 2tbsp + 2tsp
Chilli sauce - 1tbsp+1tsp
Corn flour -  2 tbsp
Salt - as needed
Food color (orange or red) - a pinch (optional)
Garlic cloves - 3, finely chopped
Onion - 1, cubed or slit lengthwise
Bell pepper (green or mixed colors) - 1 cup, cubed or slit lengthwise
Tomato paste - 1 tsp
Green onions - 2, finely chopped


Oil - for deep frying the fish and sauteing the vegetables

Yield - 2 Servings

Method:

Step1:
Cut the fillets into small pieces. Mix the cornflour, 2 tsp of soy sauce, 1 tsp of chilli sauce, salt and food color (optional) in a bowl.

Step2:
Coat the fish pieces with the corn flour mixture and deep fry them in small batches. Let them sit on a paper towel.

Step3:
Heat a little oil in a pan, saute the onion, garlic and bell pepper, uncovered in medium low, until the vegetables are cooked but little crunchy. Add the tomato paste, 2 tbsp of soy sauce, 1 tbsp of chilli sauce and salt. Bring to a boil.


Step5:
Reduce the heat to low and cook the sauce for a couple of minutes. Add the fillets, mix it well, switch off the stove and garnish with green onions.


Serve it with fried rice or noodles

Tips:
Use dark sesame oil for more authentic effect. You could also use some toasted sesame seeds for garnishing.
If you prefer a thicker gravy, mix 2 tsp of cornflour in  1/4 cup of  water and stir into the boiling gravy. The gravy will thicken in couple of minutes.